Customer-oriented attitude from beginning to the end
- home
- Service and support
Basic regulations before installation:
- Please take a carefully look at plank appearance and make sure each one is good for quality before installation.
- Please accurately calculate the area to be paved of the room, and reserve 5% ~ 10% of the floor for loss during installation according to different paving methods and floor conditions of the house before installation.
- the unopened floor shall be kept at room temperature for at least 24 hours or more to ensure that the floor is suitable for the installation environment before installation.
- Note: it is recommended that the ambient temperature be 15 ~ 30 ℃ and the ground moisture content be ≤ 4% during installation.
Construction requirements before installation:
- When the floor installation area exceeds 100 square meters (whenever the length or width is more than 10 meters), isolation joints shall be set, and a gap of 6 ~ 15mm shall be reserved according to the actual situation.
- The installation ground shall meet the flatness required in the standard regulations. The ground flatness shall be within 2m, the deviation shall be ≤ 2mm, and there shall be no sundries on the ground.
- During installation, a gap of 6 ~ 15mm shall be reserved between the wall and fixed devices (such as pipes, pillars, stairs, etc.). After installing the floor, decorative lines or skirtings can be installed above the reserved expansion gap.
- Note: ① when installing around the pipe, a hole 20mm larger than the pipe diameter shall be reserved on the floor.
- ② The expansion gap reserved for installation shall not be filled with glass glue or other fillers.
- Determine the installation direction of the floor. The length direction of the floor can be parallel to the direction of the sun or installed according to the long side direction of the ground.
- Measure the area to be installed: the floor width of the last row shall not be less than 50mm. If it is smaller than this size, please adjust the floor width of the first row to be installed.
- Note: for the installation of narrow corridors, it is recommended that the floor installation direction be parallel to the length direction of the hall.
- This product is suitable for geothermal water heating system.
- Turn off floor heating at least 48 hours before installation. After the floor is installed, gradually heat up.
- The normal use temperature after installation, and the geothermal heating temperature shall not exceed 45°C。
- Note: ① if the floor heating system is just finished, turn on the water heating system at maximum power and remove the water in the floor through it.
- ② For other guidance, please refer to the relevant recommendations and requirements of the plumbing and geothermal system manufacturer.
| basic paving process
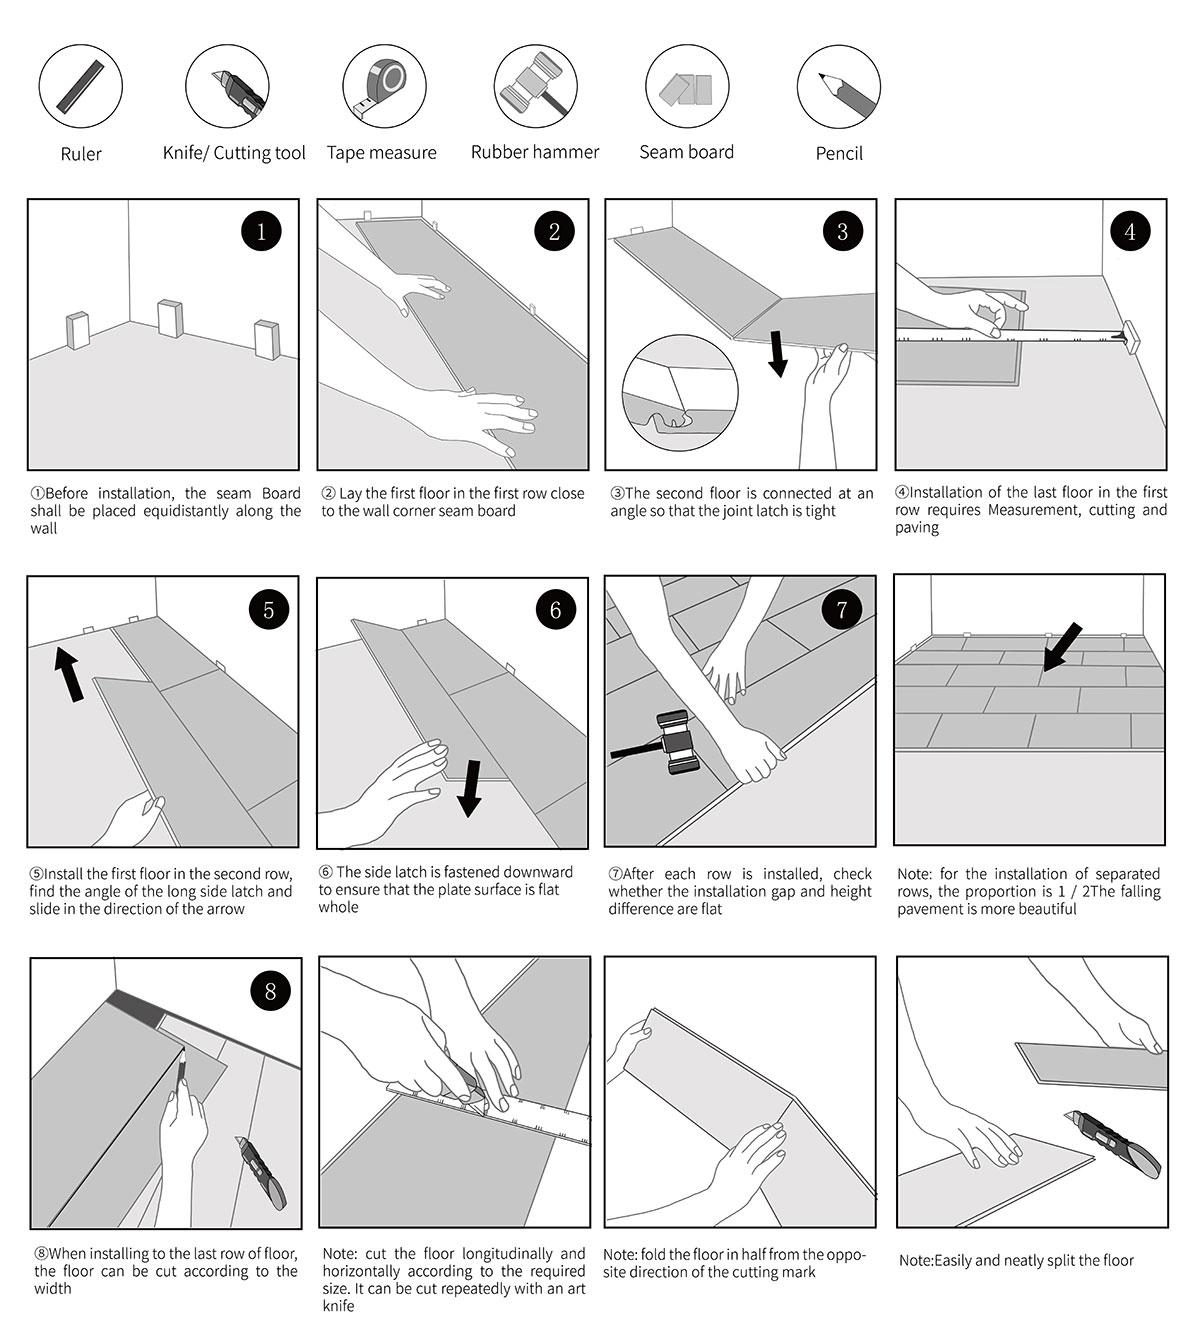
|rectangular or square floor installation
- 1、Measure room area and make plan for paving。
- 2、The first floor is better laid from the left wall in the room.
- 3、Install the second piece and mind the angle for locking
- 4、Install the first row of floorings, note the far left and right planks need to get cut to the same width in ahead.
- 5、Install the first floor in the second row, still starting from the left.
- 6、Install left lock meanwhile lift two tightly locked planks from second row and knock gradually to get all planks locked.
- 7、After each row is installed, knock and check whether the installation gap and height difference meet the standard.
- 8、Cut the last piece of plank to be installed.
- 9、Pipe hole: measure the pipe diameter and drill a 20 mm large hole. Saw off a piece as shown in the figure, and then put the plank on the floor. Then place the sawn parts in place.
- 10、Cut the door pocket and install the floor, which shall be installed under the door pocket.
|Tile shaped floor installation
- 1、 Measure the area where the floor needs to be installed. The length of the reserved cutting planks on the left and right shall be the same, and the cutting width of the first row and the last row shall be the same.
- 2、The first plate shall be installed from left to right from the upper left corner of the wall, the male groove of the floor shall be close to the wall, the female groove shall face outward, and an expansion joint shall be reserved between the floor and the wall.
- 3、The latches of the second floor and the previous floor are locked together to ensure that the two floors are aligned.
- 4、 Select the installation effect you want, including i-shop, Tian shop, etc. Please refer to the installation instructions.
- 5、Install the second row, lock the male slot of the floor and the female slot of the previous row of floor, and place an installation wedge block under the floor (at the same time, reserve expansion joints near the wall).
- 6、Install the second floor in the second row, lock it with the floor on the left side of the same row, then lock it with the floor in the previous row, and place a wedge block under the floor.
- 7、When the row is complete, remove the wedge blocks and tap the floor with the striking block to ensure that they are tightly locked together.
- 8、Lay the last row: cut the floor size required for installation. Insert the cut board into the installation position between the and the wall, then remove the gasket and complete the installation.
- 9、Pipe hole: measure the diameter of the pipe and drill a hole 20mm larger than the diameter. If shown, saw off a piece and place the board on the ground. Install the sawed part in the corresponding position.
- 10、Door pocket and skirting line: lay a board next to the door pocket (decorative side down), cut as shown in the figure, and then slide and install the floor under the door pocket.
Shide wallboard installation instructions (video)
Basic regulations before installation:
- SPC wallboard shall be paved after the completion of waterproof, doors and windows, electromechanical and other works, and wet operation and cross construction are not allowed.
- The pavement of concealed works (each structural layer) and surface course in SPC wallboard project shall be carried out after the previous process is accepted.
- After the SPC wallboard is transported to the operation site, the label shall be placed neatly and horizontally outward, and the wallboards of the same color number and different batches shall be placed separately to avoid mixing.
- Installation tools and auxiliary materials include: special sealant, level gauge, air nail gun, double-sided tape, tape measure, woodworking pencil, leveler, various lines, structural glue, glass glue gun, square ruler, etc.
Construction requirements before installation:
- The paved wall must be flat and strong wall adhesion before installation.
- If the wall is uneven, the wall shall be leveled:
- ①It is recommended to use wood board or wood strip to level the uneven base wall with poor adhesion, so as to increase the flatness and wall adhesion;
- ②The rough cement wall shall be leveled with mastic to meet the requirements of flatness and bonding strength.
- Basic principles of installation sequence
- ①Based on the principle of from outside to inside, it is installed from the wall of the room to the inside, which can improve the overall beauty of the room.
- ②The longitudinal construction shall generally be carried out from bottom to top. However, in order to ensure that each plate is on the same horizontal line on the four walls, the construction shall be carried out in both upward and downward directions starting from the unified datum line of the four walls.
- ③Horizontal construction shall follow the principle of starting from external corners to internal corners, ensuring the symmetry and symmetry of special structures (such as doors and windows), and then large-scale construction. The reserved height below shall be reserved in consideration of the skirting line to be installed, and the reserved height above shall be reserved in consideration of the top corner line to reflect the overall paving effect.
- ④In the installation sequence, one plate shall be spliced first, and then the lines shall be installed, and so on. First install in a large area, and then use metal components to deal with corner, edge closing and other details. If the column is encountered, the back slotting method can also be used to wrap the column.
Wallboard installation method
| Direct paste paving method.
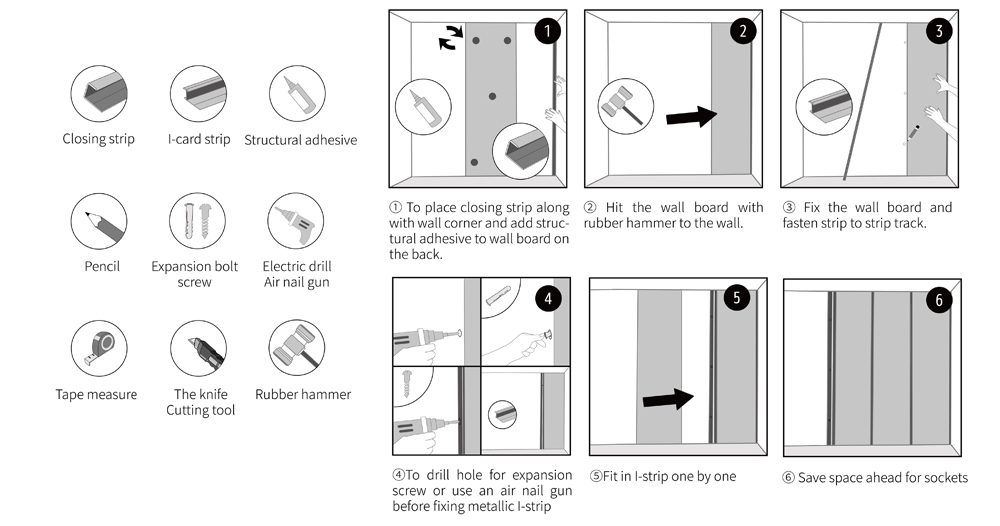
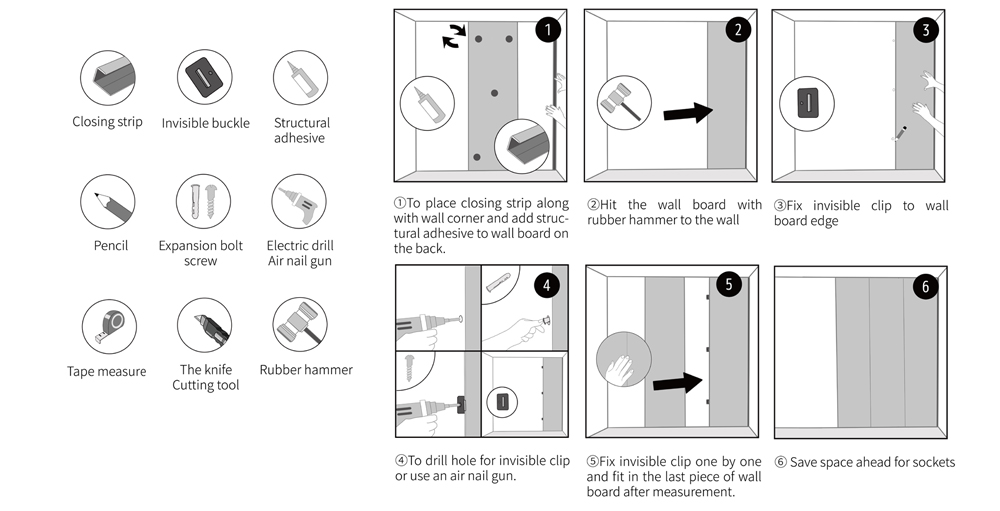
- 1、Wall gauge and wall panel cutting
- When the wall panel needs to be cut, it can be treated with a cutting saw.
- 2、Positioning structure adhesive application
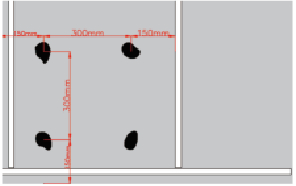
- The special structural adhesive for wall panel pasting shall be used for coating. There shall be at least 5 glue spots on a plate, the area of glue dispensing solution at each glue spot shall be 4-6cm2, the spacing between glue spots shall not be greater than 300mm, the distance between glue spots and edges shall not be greater than 150mm, one point shall be coated on each corner of the wall panel, and one or more points shall be added in the middle of the plate. See the figure below for the schematic diagram of structural adhesive application. Considering the initial strength, glass adhesive can be used to enhance the initial bonding effect.
-
- 3、Wallboard bonding and installation
- During the installation of the first wall panel, the first wall panel can be fixed on the wall with structural glue, steel nails and metal clips, and then the next wall panel can be installed continuously in order. During installation, use a small rubber hammer or palm to tap the gluing point to fully bond the glue liquid with the wall.
- Note:①in case of socket and other positions, the position shall be reserved in advance.
- ②If some points are not pasted well or separated from the wall, it is necessary to add glue and press it into the back of the plate with a trowel.
- 4、Installation of decorative lines
-
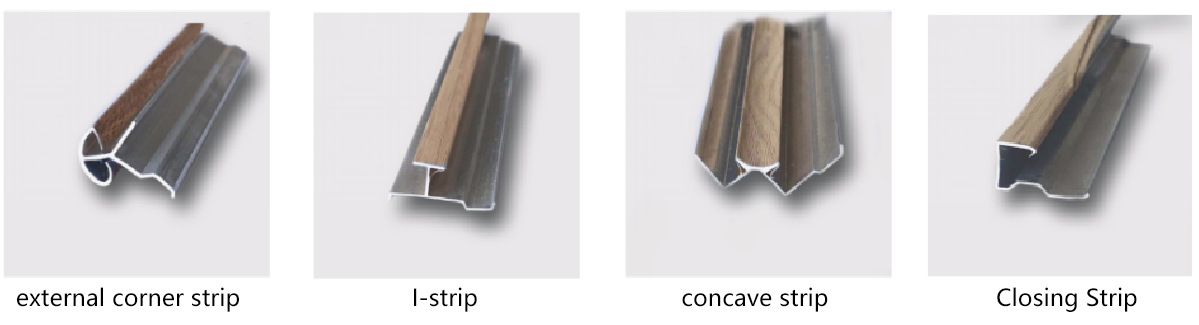
- For the transition between wallboards, closing strips, internal corner strips, external corner strips, i-strips and other lines are used for auxiliary decoration and installation.
- ①At the outer corner of the wall, the external corner line can be used for transition between the two walls, and the lines can be fixed with gun nails.
- ②Where the wall faces the inner corner, the internal corner line can be used for transition between the two walls, and the lines can be fixed with gun nails.
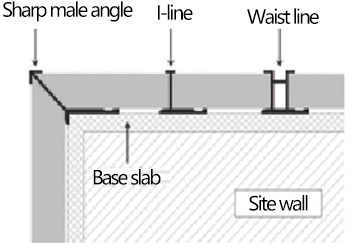
- ③See the figure below for typical decorative lines and basic installation structure.
- 5、 Application of sealant
-
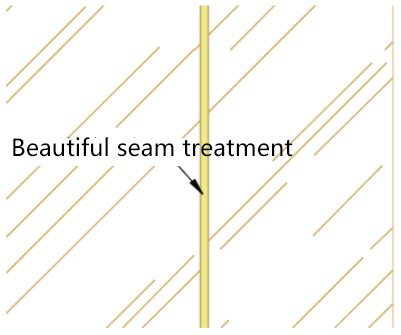
- The decorative scheme of joint agent is adopted between wallboards. The application methods are as follows: gap cleaning (cleaning the gap) joint agent filling (gently pushed by the glue gun) joint agent cleaning (3-5M blank holder ball joint pressing)
- Note: 24 hours after construction (24 hours in summer and 48 hours in winter, depending on the weather), use the joint cleaning blade to clean the excess joint agent on the wallboard and tear off the textured paper.
- 6、Bottom treatment
-
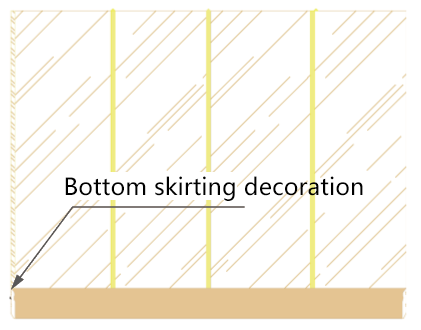
- ①In order to achieve the integrity of the decorative effect, a matching skirting line can be installed at the bottom of the wallboard. The skirting line can be installed by dispensing on the back or using fasteners.
- ②The bottom of the wall panel shall be leveled with cushion strips such as wall panel strips, which shall be fixed with the wall to support the wall panel. It is also necessary to ensure that at least 10mm reserved joints are reserved between the wall panel strip and the ground.
- See the figure below for the schematic diagram of bottom treatment.。
- 7、 Top treatment
- In order to achieve integrity, the top corner line can be installed on the top, or the ceiling can be installed after the wall panel is installed.
- 8、Quality inspection
- According to the standards and design requirements, the quality inspection of wallboard pavement shall be carried out, focusing on the bonding firmness, fastener installation firmness, flatness, appearance effect, etc.
|Invisible clasp pavement
Shide wallboard maintenance guide
Precautions for SPC wallboard maintenance
- When cleaning in a small range, remove the floating dust on the wall panel surface and clean the wall panel with neutral detergent or weak alkaline detergent. The dirt and corners that are difficult to remove can be cleaned with nylon brush and detergent. After cleaning, clean the wall with clean water and ensure that there is no detergent residue.
- It is advisable to use diluted chemicals to treat stubborn stains, rather than mechanical scrubbing and decontamination powder.
Shide wallboard maintenance guide
- Cleaning and maintenance before use after floor laying
- First remove the dust and sundries on the floor surface.
- Clean the floor with 3M red grinding plate or similar products at low speed (dilute it with strong general cleaner 1:20 mixed with water and add it into the floor cleaner), remove the protective wax, grease, dust and other dirt on the floor surface, and suck the sewage dry with a water suction machine.
- Wash with clean water and suck dry. If necessary, apply 1-2 layers of high-strength surface wax.
- Cleaner: powerful general cleaner, high-strength face wax. Tools: ground grinding machine, red grinding plate, water suction machine, wax drag water press.
- Tools: ground grinding machine, red grinding plate, water suction machine, wax drag water press.
- Daily simple cleaning and maintenance
- Dust pushing or vacuum cleaner: drag the dust pulling agent on the ground, dry it and push the dust.
- Wet mop: dilute the floor cleaning and polishing agent with 1:20 water, and mop the floor with a semi wet mop.
- Cleaning agent: ground drag dust agent, floor cleaning and polishing agent.
- Tool: dust push mop.
- Regular cleaning and maintenance
- Push dust or vacuum cleaner. The floor cleaning and polishing agent shall be diluted with water at the ratio of 1:20 for mopping or grinding with high-speed polishing machine and red grinding plate. Apply 1-2 layers of high-strength surface wax. If necessary, it can be polished with high-speed polishing machine and white polishing pad.
- Cleaner: floor cleaning and polishing agent, high-strength surface wax.
- Tools: dust pusher, ground grinder, grinding plate, water suction machine, wax drag water press.
- Complete refurbishment treatment
- Push dust or vacuum cleaner.
- Wash with clean water and suck dry until there is no residual detergent on the ground. If necessary, apply 1-2 layers of high-strength surface wax.
- Cleaner: floor cleaning and polishing agent, high-strength surface wax.
- Tools: dust grinding machine, red and white grinding plate, water suction machine, wax drag water press.
- Treatment of special dirt
- Oil stain: for local oil stain, pour the original solution of water-based degreasing agent directly onto the towel to wipe; For large area of oil stain, dilute the water-based degreasing agent according to 1:10, and clean it at low speed with a floor cleaner and a red grinding plate.
- Black offset printing: polishing with spray cleaning and maintenance wax, high-speed polishing machine and white polishing pad. For a long time of black offset printing, you can directly pour a strong black offset remover on a towel to wipe it.
- Glue or gum: pour professional strong glue remover directly onto the towel to wipe it off.
- Cleaning agent: water-based degreaser, cleaning and maintenance wax, black offset remover and glue remover.
- Nursing precautions
- All kinds of dirt on the ground shall be removed in time.
- It is absolutely forbidden to soak the stone plastic floor in open water. Although some floors use waterproof glue to cut off the water source (such as floor drain, water room, etc.), soaking in water for a long time will seriously affect the service life of the stone plastic floor. In the cleaning process, the sewage shall be sucked dry with a water suction machine in time.
- For places with large flow of people and large wear, shorten the maintenance cycle and increase the number of waxing times of high-strength surface wax. It is absolutely forbidden to use hard and rough cleaning tools (such as steel wire ball, cleaning cloth, etc.) to prevent sharp objects from colliding.
- It is strongly recommended to place foot pads at the entrance of public places with high traffic to prevent dirt, sand and other contamination and scratches.
Common problem
- 1.Is this floor easy to take care of?
- Because the surface of Jiashi Yibao brand floor has special process treatment, it is particularly easy to take care of. Usually, it can be cleaned with a general mop, saving time, labor and worry.
- 2.Do you need waxing?
- After the installation of Jiashi Yibao brand floor, there is no need to use essential oil and waxing for special care. As long as you use general daily cleaning and care, you can be as clean as new.
- 3.Will it be bad if it is blistered?
- Jiashi Yibao brand floor board is waterproof and moisture-proof. It fundamentally solves the problem that wood products are easy to rot, expand and deform due to water absorption and moisture in humid and watery environment. It can be applied to the environment where the traditional wooden floor cannot be applied, such as kitchen and bathroom. At the same time, the stability of the product base material determines that it will not crack, swell and warp, and the indoor space from extremely cold (- 20 ℃) to extremely hot (60 ℃) can be used without worry.。
- 4.What is the paving method like?
- Jiashi Yibao brand floor adopts the most concise suspension paving method. All wood floor paving masters on the market can carry out seamless connection construction.
- 5.Is it suitable for the kitchen?
- Jiashi Yibao brand determines from the raw materials of the products that Shide flooring can be used in environments where traditional wood flooring cannot be used, such as kitchens and bathrooms.
- 6.Is it suitable for toilet?
- Jiashi Yibao brand is completely waterproof and can be applied to the bathroom. For example, it solves the problem of uneven ground in the wet area of the bathroom, and can also be applied to the wet area.
- 7. Is it suitable for balcony?
- Jiashi Yibao brand uses colored paper in traditional wood flooring to improve light fastness to ensure.
- 8.Will it change color after a long time in areas with more sunlight?
- Jiashi Yibao brand uses colored paper on the traditional wood floor to improve the color fastness to light, so as to ensure that it will not change color under UV irradiation. On the basis of an additional layer of UV paint technology, it will fade more than the traditional floor, so it can completely ensure that it will not fade when used in the sunshine area.
- 9. Will arching and bulging occur?
- NO. Arching and bulging these common phenomena in the daily use of wood flooring are caused by the deformation of wood in case of water, which is not moisture-proof and waterproof. Jiashi Yibao brand floor overcomes the disadvantage of wood floor because of its base material production technology, so it will not arch and drum.
- 10.Will the surface fall off?
- Ordinary floor is composed of wear-resistant layer, decorative layer, base material and balance layer by hot pressing with rubber press, while these layers of jiashiyibao brand floor are formed by CO extrusion, so delamination may not occur like traditional floor.
- 11.Can wires be installed under the floor, and the decoration effect can be achieved by using Shide wallboard?
- sure. Jiashi Yibao brand floor is anti-static and non-conductive.
- 12.What is the difference between Shide floor and SPC floor on the market? How to identify with the naked eye?
- The calcium carbonate and resin used in Shide flooring have high purity and no secondary recycling waste. The contrast between the naked eye and SPC on the market can be seen from the color. The nature of calcium carbonate powder is that the higher the purity, the whiter. Therefore, the color of Jiashi Yibao brand floor is higher than that of some cost-saving manufacturers on the market.

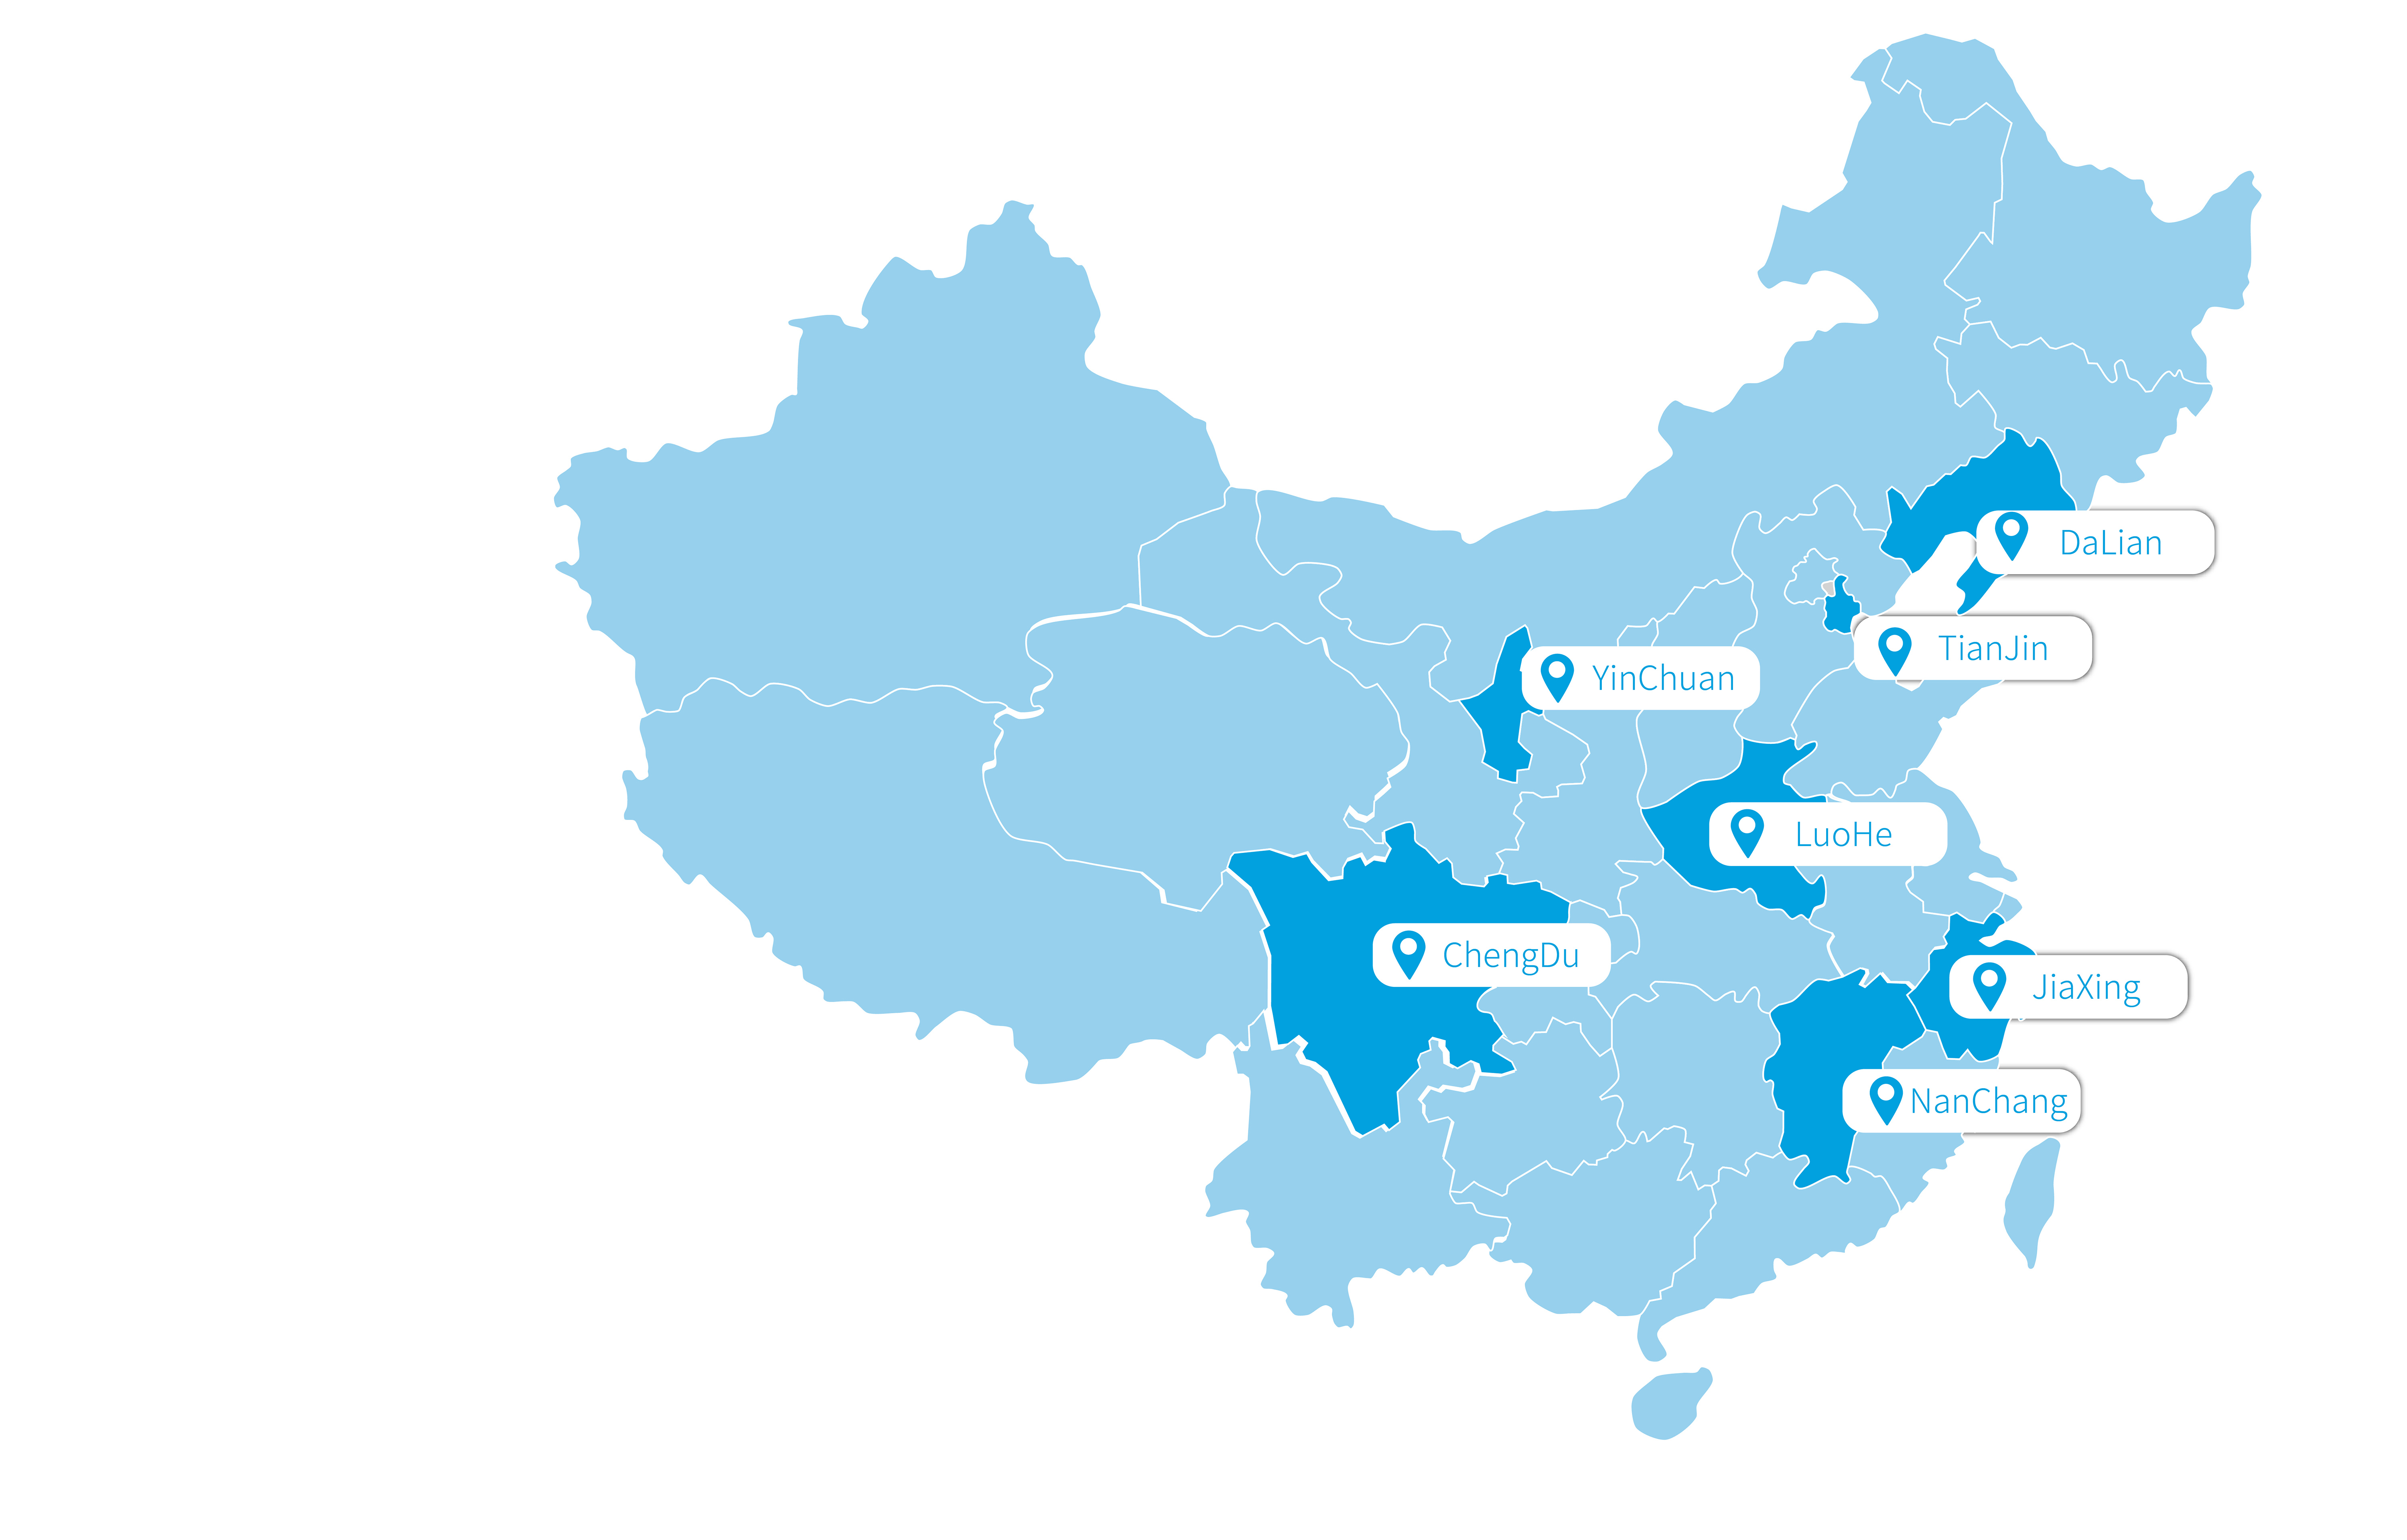
Shide Dalian building materials base
- Shide Industrial Park, No. 55, mosquito mouth street, Lingang Industrial Zone, Changxing Island, Dalian
- Contact: Manager Wang
- Tel:0411-39923335
- Service scope: Hei, Ji, Liao and Mengdong

Shide Jiaxing building materials base
- Shide Industrial Park, Daqiao new area, Haiyan Economic Development Zone, Zhejiang Province
- Contact: Manager Xiao
- Tel:0573-863082
- Company service scope: Jiangsu, Zhejiang, Shanghai and Anhui

Shide Chengdu building materials base
- Shide Industrial Park, No. 24, Xingguang West Road, Longquanyi District, Chengdu, Sichuan
- Contact: manager Liu
- Tel:028-84856677
- Company service scope: cloud, Guizhou, Sichuan and Chongqing

Shide Luohe building materials base
- Shide Industrial Park, Taihang Mountain North Road, MENGNAN Development Zone, Luohe City, Henan Province
- Contact: Manager Dong
- Tel:0395-5611598
- Company service scope: Hubei, Henan and Southeast Shandong

Shide Nanchang building materials base
- Anyi Fenghuang Industrial Park Shide group Jiangxi new building materials Co., Ltd., Anyi County, Nanchang City, Jiangxi Province
- Contact: Manager Liao
- Tel:0791-83499377
- The company's service scope: Guangdong, Fujian, Guangxi, Hunan, Jiangxi and Hainan

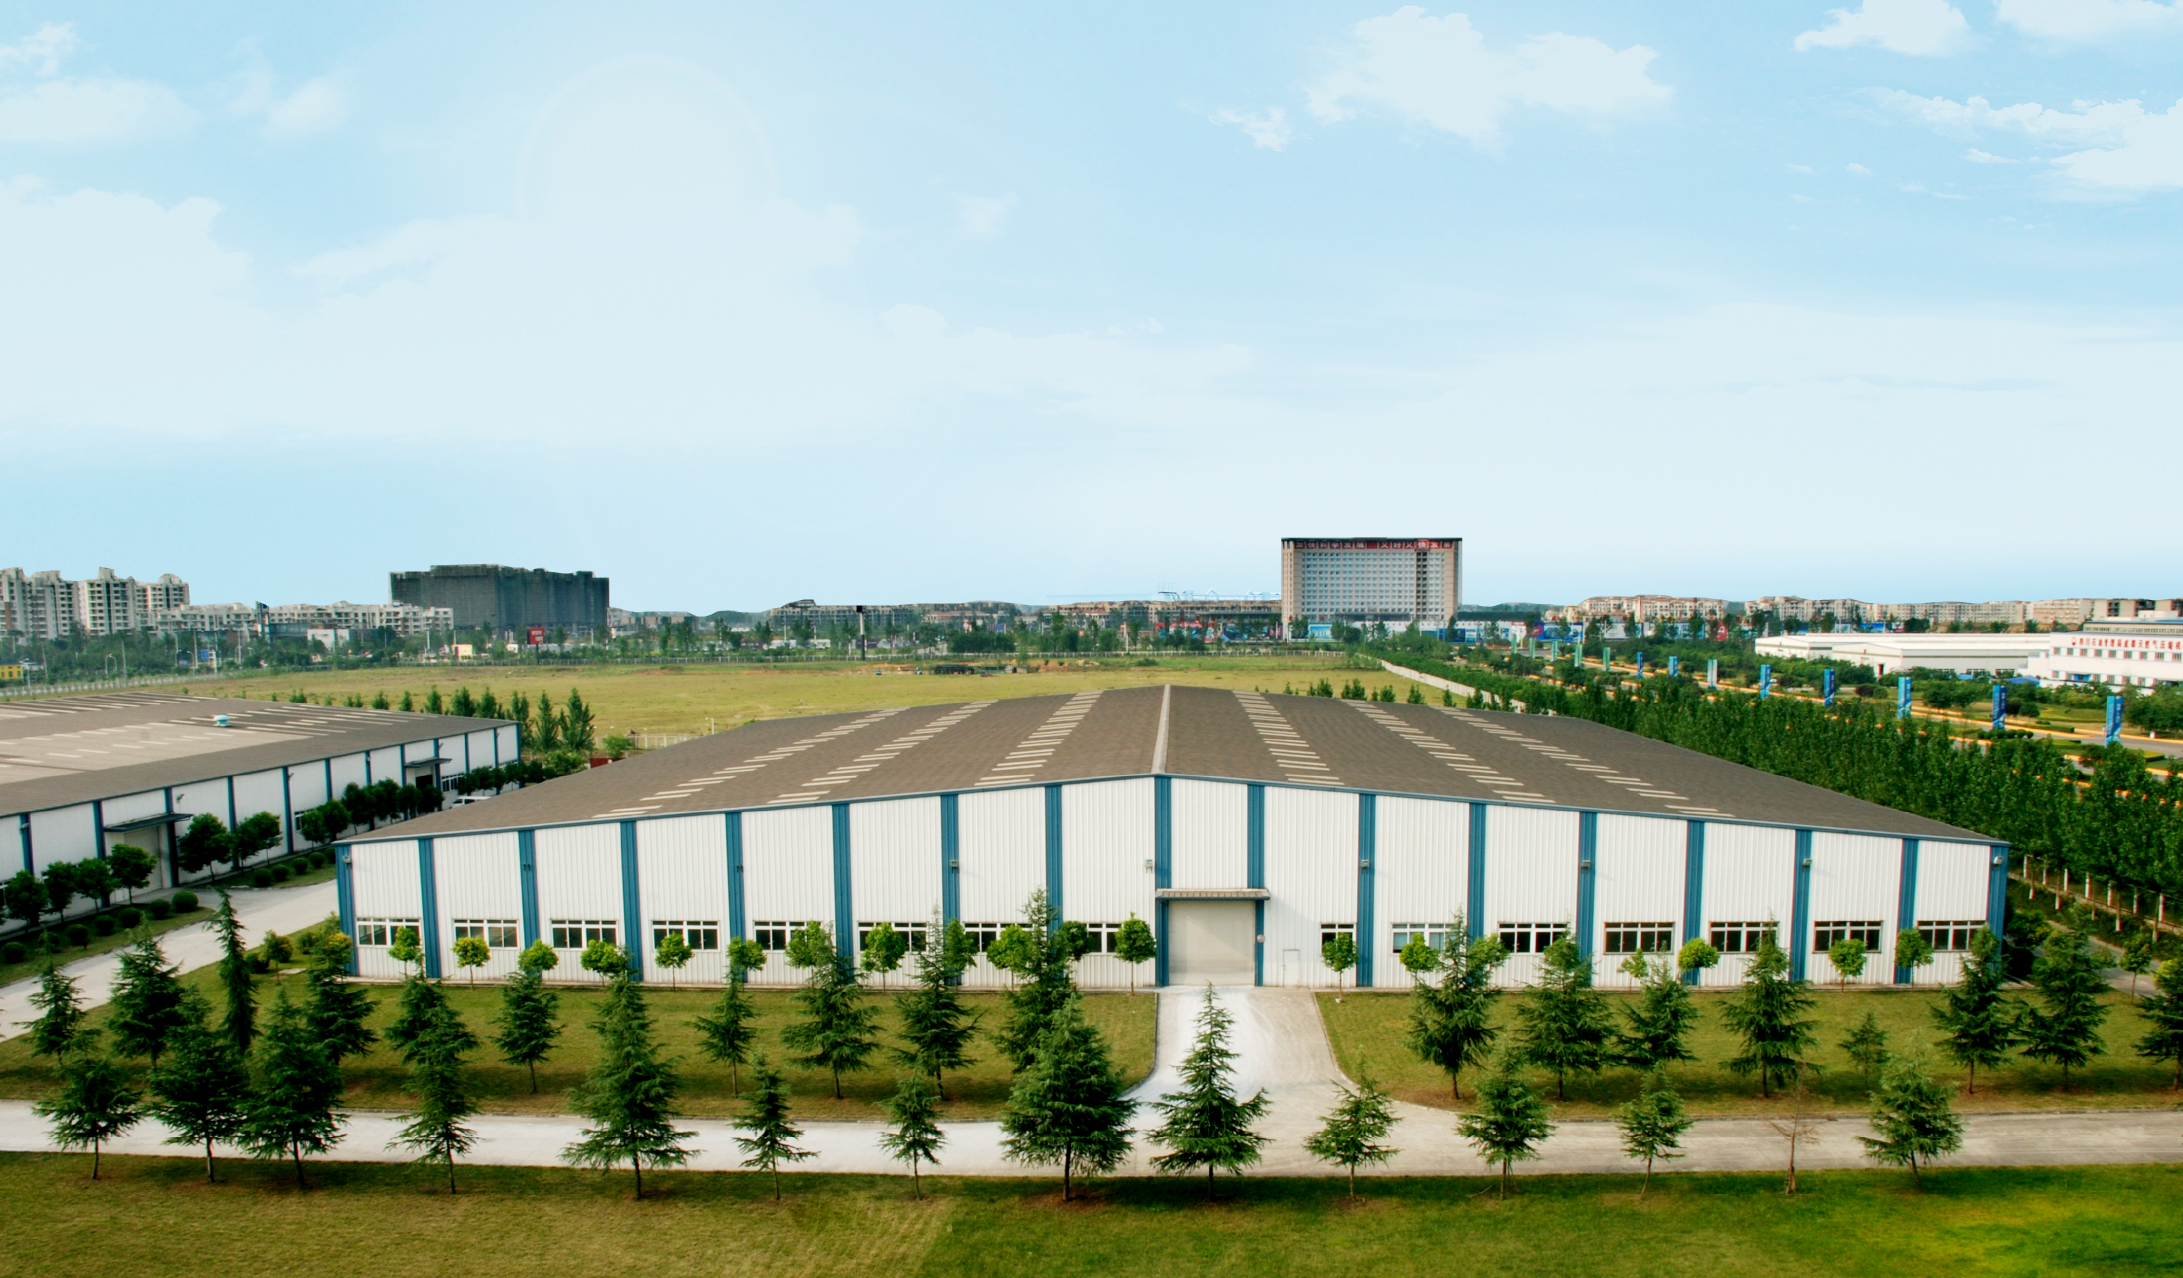
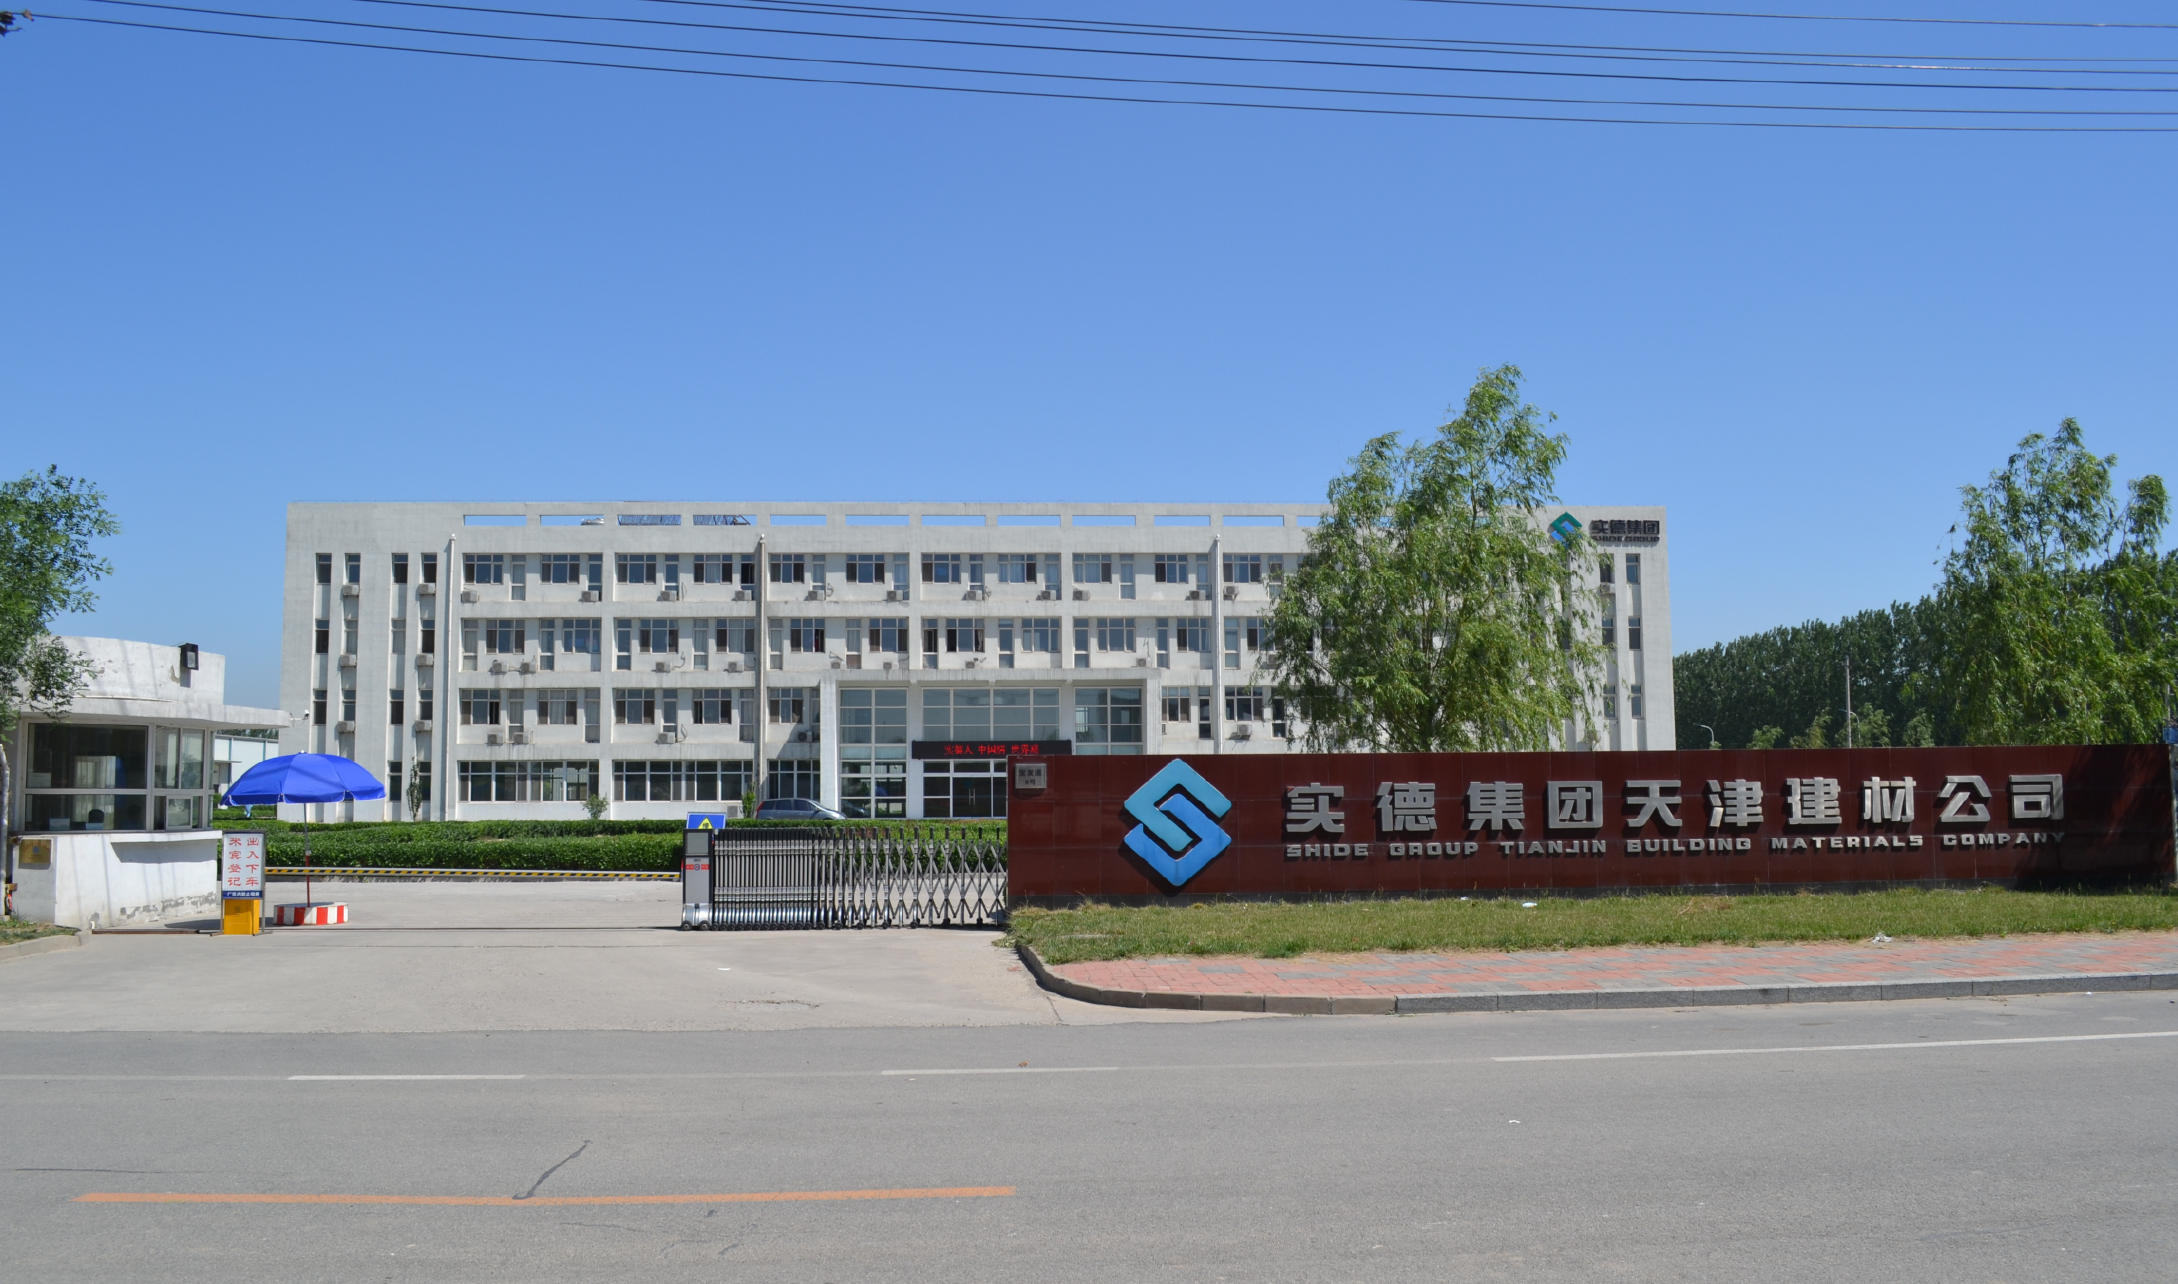
Shide Tianjin building materials base
- No. 8, Baofa Road, Tianbao Industrial Park, Baodi District, Tianjin
- Contact: Manager Yue
- Tel:022-22458801
- The company's service scope: Beijing, Tianjin, Hebei, Northwest Shandong and central Mongolia

Shide Yinchuan building materials base
- Yinchuan sales branch, Shide Park, economic development zone, 218 Wenchang South Road, Xixia District, Yinchuan
- Contact: Manager Li
- Tel:0951-7680114
- Company service scope: new, Shaanxi, Gansu, Ningxia, Qinghai, Tibet, Shanxi, Mengxi

Want to know more?